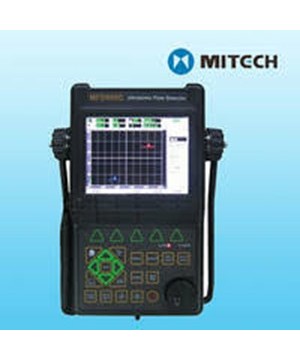
MFD800C
Perhatian!
Spesifikasi MFD800C
Spesifikasi MFD800C
Alat Ukur Ketebalan
1 Introduction
The MFD800C is an advanced digital ultrasonic flaw detector featuring a multi-color TFT LCD and a host of new features to meet challenging inspection requirements. It combines powerful flaw detection and measurement capabilities, extensive data storage, and the ability to transfer detailed inspection data to the PC via its high-speed USB port.
The instrument incorporates many advanced signal processing features including a 15MHz RF bandwidth to permit testing of thin materials, narrowband filters to improve signal to noise in high gain applications, a spike pulser for applications requiring higher frequencies, and a tunable square wave pulser to optimize penetration on thick or highly attenuating materials.
The instrument can be widely used in locating and sizing hidden cracks, voids, disbands, and similar discontinuities in welds, forgings, billets, axles, shafts, tanks and pressure vessels, turbines, and structural components.
1.1 Features of the Instrument
The instrument extends the performance and range of applications that are capable of being satisfied by a portable instrument. The quality, portability, durability, and dependability that you have come to expect from the popular Mitech MFD Series of instruments remain.
Display
Hi-resolution (640×480 pixels) multi-color TFT LCD with 4 user-selectable brightness control provides high contrast viewing of the waveform from bright, direct sunlight to complete darkness.
The hi-resolution multi-color TFT LCD display with fast 60 Hz update gives an “analog look” to the waveform providing detailed information that is critical in many applications including nuclear power plant inspections.
Range
Up to 9999 mm in steel; range selectable in fixed steps or continuously variable. Suitable for use on large work pieces and in high-resolution measurements.
Pulser
Pulse Energy selectable among 200V, 300V, 400V, 500V and 600V..
Pulse Width tunable from 0.1µs to 0.5 µs to match the probes with different frequency.
Pulse Repetition Frequency adjustable from 10 Hz to 1 KHz in 1 Hz increments.
Damping selectable among 68Ω、100Ω、150Ω and 500Ω for optimum probe performance
Test Modes include Pulse echo, dual and thru-transmission
Receiver
Sampling:10 digit AD Converter at the sampling speed of 160 MHz
Rectification:Positive Halfwave, Negative Halfwave, Fullwave and RF
Analog Bandwidth: 0.5MHz to 15MHz capability with selectable frequency ranges (automatically set by the instrument) to match probe for optimum performance.
Gain:0 dB to 110 dB adjustable in selectable steps 0.1 dB, 2 dB, 6 dB, and locked.
Gates
Two fully independent gates offer a range of measurement options for signal height or distance using peak triggering.
The echo-to-echo mode allows accurate gate positioning for signals which are extremely close together.
Gate Start: Variable over entire displayed range
Gate Width: Variable from Gate Start to end of displayed range
Gate Height: Variable from 0 to 99% Full Screen Height
Alarms: Threshold positive/negative
Memory
Memory of 1000 channel files to store calibration set-ups
Memory of 10000 wave files to store A-Scan patterns and instrument settings.
All the files can be stored, recalled and cleared.
Video Recorder
Screen scenes can be captured as movie files. More than 10 hours movie can be saved to the inside memory. They can be re-played using the instrument or the PC software delivered with the instrument.
Video Recorder is useful in many situations, it is very convenient for those who want to analyze the probing activities later.
Functions
- Semiautomatic two point calibration: Automated calibration of transducer zero offset and/or material velocity
- Flaw Locating:Live display Sound-path, Projection (surface distance), Depth, Amplitude,
- Flaw sizing: Automatic flaw sizing using AVG/AVG or DAC, speeds reporting of defect acceptance or rejection.
- Digital Readout and Trig. Function: Thickness/Depth can be displayed in digital readout when using a normal probe and Peam path, Surface Distance and Depth are directly displayed when angle probe is in use.
- Both the DAC and the AVG method of amplitude evaluation are available.
- AWS D1.1.
- Curved Surface Correction feature
- Crack Height Measure function
- Weld figure feature
- Magnify gate:spreading of the gate range over the entire screen width
- Video Recording and play
- Auto-gain function
- Envelope: Simultaneous display of live A-scan at 60 Hz update rate and envelope of A-scan display
- Peak Hold: Compare frozen peak waveforms to live A-Scans to easily interpret test results.
- A Scan Freeze:Display freeze holds waveform and sound path data
- B Scan display feature
Real Time Clock
The instrument clock keeps running tracking the time.
Communication
High speed USB2.0 port. Two USB modes can be selected: U-DISK and U-BRIDGE. In U-DISK mode, the instrument acts as a usb flash disk when connected to pc. Configuration files, saved pictures and recorded movies can be copied to pc when possible. In U-BRIDGE mode, the instrument exchanges data with DataPro Software. The optional DataPro software helps manage and format stored inspection data for high-speed transfer to the PC. Data can be printed or easily copied and pasted into word processing files and spreadsheets for further reporting needs. New features include live screen capture mode and database tracking.
Battery
Internal rechargeable Li-ion battery pack rated 7.2V at 8800 mAh
10 hours nominal operating time depending on display brightness
8-10 hours typical recharge time
Knob
Operating adjustments are easily and quickly made using the rotary knob.
1.2 Specifications
- Range: 0 to 9999 mm, at steel velocity
- Material Velocity: 1000 to 9999m/s
- Display Delay: -20 to 3400 µs
- Probe Delay/Zero Offset : 0 to 99.99µs
- Sensitivity: 110 dB max in selectable resolution 0.1, 1.0, 2.0, 6.0 dB and locked.
- Test Modes: Pulse echo, dual element and thru-transmission
- Pulser: Tunable Square Wave Pulser
- Pulse Repetition Frequency ranges from 10 Hz to 1000 Hz
- Pulse Energy: 200V, 300V, 400V, 500V, 600V selectable
- Bandwidth (amplifier bandpass ): 0.5 to 15 MHz
- Gate Monitors: Two independent gates controllable over entire sweep range
- Rectification: Positive half wave, negative half wave, full wave, RF
- System Linearity: Horizontal: +/-0.2% FSW, Vertical: 0.25% FSH, Amplifier Accuracy +/-1 dB.
- Reject (suppression): 0 to 80% full screen height
- Units: Inch or millimeter
- Transducer Connections: BNC or LEMO
- Power Requirements: AC Mains 100-240 VAC, 50-60 Hz
- Operating Temperature: -10℃ to 50℃
- Storage Temperature: -30℃ to 50℃
1.3 base Instrument Package
Portable Ultrasonic Flaw Detector with multi-color TFT LCD Display
Straight Beam Transducer (4 MHz, Φ10)
Angle Beam Transducer (4 MHz, 8 mm×9 mm, 60°)
Interconnect Cable for the transducer (Q9-C5,or optional C9- C5)
Rechargeable Li-Ion Battery Package, 8.8 amp hour
Power supply/charger unit
Supporting pillar
Operating Manual in English
Datapro Software
USB Cable (Model: MUSB01)
Harga MFD800C
PT Andalan Bangun Sejahtera


